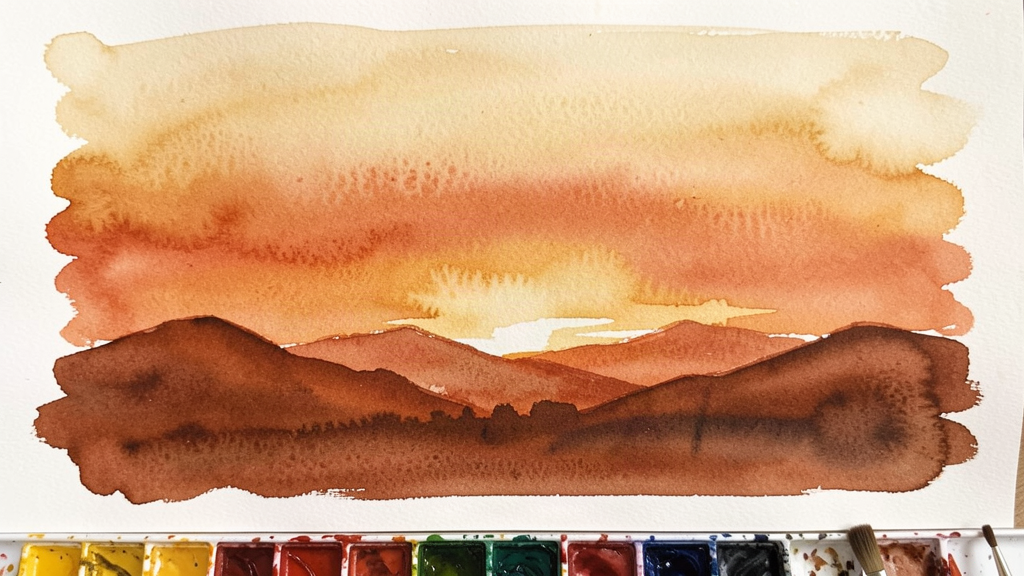
There is a reason watercolor and sunsets belong together. Both are about light passing through a translucent medium, and both reward the artist who learns to work quickly, confidently, and with a healthy tolerance for surprise. The sunset sky is watercolor at its most generous — colors blend on their own, edges soften without effort, and even a mistake can look like an atmospheric effect you planned. But it is also watercolor at its most demanding, because the window of working time is short and the transition from brilliant to muddy happens in the space of a single brushstroke.
What follows is not a single painting demonstration but a toolkit — seven techniques that, taken together, will give you the vocabulary to paint any sunset you can imagine. Some you will use in every painting. Some you will reach for only when a particular sky calls for them. The goal is not to master them in isolation but to know which one to pick up at the moment the paint is drying and the light is changing.
From our network: Opened Terminal — exploring the digital art tools and AI software reshaping how artists create.
1. The Wet-on-Wet Sky Wash
This is the foundation of every sunset painting, and it is the technique that most beginners get wrong — not because it is difficult, but because it requires a kind of patience that feels counterintuitive. You begin by wetting the entire sky area of your paper with clean water, using a large flat brush or a sponge. The paper should be evenly damp — glossy but not pooling. Then, while the surface is still wet, you touch your loaded brush to the paper and let the pigment spread on its own.
The key insight is this: you are not painting the sunset. You are creating the conditions for the sunset to happen. The water on the paper does the blending. Your job is to choose where each color goes and to let the surface carry it. Start with the lightest warm tone — a pale cadmium yellow or a diluted raw sienna — at the horizon, and introduce progressively deeper colors as you move upward: orange, then red, then a violet or deep blue at the top of the sky. A quality watercolor set like the Daniel Smith Essential Watercolor Set gives you the granulating pigments that make sunset washes sing — their French Ultramarine and Quinacridone Burnt Scarlet are particularly suited to this work.
The most common mistake is overworking. Once the color is down, leave it alone. Every additional brushstroke through a wet wash is a chance to create mud. Trust the water.
2. Graded Washes for the Color Gradient
A graded wash is a controlled transition from one color to another across a defined area. In a sunset, you are almost always working with a vertical gradient: warm at the horizon, cool at the zenith. The technique differs from wet-on-wet because you are working on damp or dry paper and controlling the transition with deliberate brushwork.
Load your brush with the lightest color and sweep a horizontal band across the horizon. Immediately rinse the brush, load it with the next color, and stroke across the band just above, letting the edge between the two colors soften. Continue up the page, changing colors as you go. The trick is to work fast enough that each band is still damp when you apply the next, allowing a gentle blend at the boundary. If you wait too long, you will get hard lines — which can be beautiful, but are not what a graded wash is for.
For this technique, brush selection matters enormously. A good round watercolor brush in size 10 or 12 — preferably squirrel or goat hair for its water-holding capacity — will let you carry enough pigment for a full sweep without reloading mid-stroke.
💡 Brought to you by XCalitoy — custom art products and creative commerce for artists who want to turn their work into something tangible. Explore custom prints, branded merch, and more.
3. Lifting and Blotting for Clouds
Sunset clouds are not painted — they are revealed. The technique of lifting removes pigment from the paper to create the impression of cloud shapes within an already-painted sky. After your wash is laid down but still damp, take a clean, slightly damp brush (or a folded paper towel, or a natural sponge) and gently lift pigment from specific areas. The paper underneath shows through, creating the soft, luminous edges of clouds catching the last light.
The timing here is everything. If the paper is too wet, the pigment flows right back into the area you lifted. If it is too dry, you will get harsh, scrubbed-looking patches. The ideal moment is when the surface has lost its glossy sheen but is still cool to the touch — what watercolorists call the "damp" stage. For artists interested in the deeper geometric principles behind natural forms like clouds and light refraction, the exploration of sacred geometry in art at Tarosyn offers a fascinating perspective on the underlying patterns that govern visual harmony.
"The sunset does not wait for you to be ready. Paint fast, trust the water, and remember that a lost edge is often more beautiful than the one you controlled."
4. Salt Texture for Atmospheric Granulation
This is one of those techniques that feels like a trick, but it is genuinely useful and has been employed by watercolorists for over a century. While your sunset wash is still wet — not damp, wet — sprinkle coarse sea salt across the surface. The salt crystals draw pigment and water toward themselves, creating small, star-like blossoms of granulation that read as atmospheric texture: distant cloud patterns, sea spray, or the fine particulate haze that sits along the horizon at dusk.
Leave the salt in place until the paper is completely dry — at least fifteen to twenty minutes, depending on humidity. Then brush it off gently with a dry hand or a soft brush. The pattern it leaves is unpredictable, which is part of its charm. You cannot control exactly where each crystal will land or how much pigment it will pull, but you can control the density of the salt and the wetness of the wash, which gives you a degree of influence over the overall effect.
For a finer texture, use table salt. For larger, more dramatic blooms, use coarse or flaky sea salt. And if the effect is too strong, a light damp brush passed over the area afterward will soften it.
5. Dry Brush for Sun Rays and Horizon Lines
When the wash is dry and you want to add the sharp, linear elements that give a sunset its structure — the thin line of the horizon, the radiating shafts of light that break through clouds, the silhouette of a distant tree line — dry brush is your tool. Load your brush with pigment, then blot most of the water out of it on a paper towel. The brush should feel almost dry to the touch. When you draw it across the rough surface of cold-pressed paper, the pigment catches only on the raised tooth of the paper, creating a broken, textured line that reads as light filtering through atmosphere.
This technique is also how you create the dark, dramatic silhouettes that anchor a sunset painting. A distant hill, a stand of trees, a coastal headland — painted in dry brush with a dark neutral (payne's grey and burnt sienna mixed on the palette), these elements give the sky its scale and its drama. Without them, even the most beautiful sunset wash looks like it is floating in a void.
6. Color Mixing for Authentic Sunset Palettes
The most common mistake in sunset painting is reaching for a tube of "sunset orange" and expecting it to do the work. Authentic sunset colors are nearly always mixed, not taken straight from the tube, because the sky is not a single hue but a continuous temperature gradient. Understanding how warm and cool pigments interact on the paper is what separates a convincing sky from a decorative one.
Here is a practical palette to start with: at the horizon, a mix of cadmium yellow pale and a touch of quinacridone gold. Moving upward, transition to cadmium red light mixed with a small amount of burnt sienna. Above that, alizarin crimson or quinacridone rose. And at the top of the sky, a blue — either French ultramarine for a warmer, violet-leaning zenith, or phthalo blue for a cooler, greener one. The junction where the warm reds meet the cool blues is the most critical area in the painting. If you blend through it too aggressively, you get a muddy purple. If you leave it too sharp, the sky looks divided rather than continuous. The answer is to let the two colors meet on wet paper and fuse just enough — a breath of a brushstroke across the boundary — to create a transition that feels like atmosphere rather than a painted line.
For those who want to explore the intersection of traditional techniques and contemporary practice, women artists redefining watercolor today at Girl Next Up showcase how modern creators are pushing these classical techniques into bold new territory. And if you are curious about turning your finished paintings into custom products — prints, textiles, branded merchandise — Joseph Calitoy offers an open-source framework for custom product design and manufacturing that is worth a look.
7. Glazing for Depth and Luminosity
Glazing is the application of a thin, transparent wash over a dry area of the painting. It is the technique that gives watercolor its unique luminosity, because the light that strikes the paper passes through the transparent glaze, reflects off the white paper, and passes back through the pigment — giving the color a glow that cannot be achieved by mixing the same color on the palette and applying it in a single coat.
In a sunset painting, glazing serves two purposes. First, it allows you to deepen the color in specific areas without disturbing the underlying wash. If the orange band near the horizon needs to be more intense, you glaze a thin layer of the same orange over it once it is bone dry. The underlying wash is untouched; the new layer simply adds depth. Second, glazing with a complementary color creates optical grays and neutrals that are far more lively than anything you can mix directly. A thin glaze of blue over an orange area produces a smoky warmth that reads as atmospheric haze. A thin glaze of violet over a yellow area produces a luminous gray that reads as the last breath of light.
The rules for glazing are simple but unforgiving: the underlying layer must be completely dry (wait at least two hours, or use a hair dryer if you are impatient), the glaze itself must be thin and transparent (more water than pigment), and you must apply it with a minimum of brushwork. Every pass of the brush through a wet glaze risks lifting the color underneath. Load the brush, lay the color down in one confident sweep, and stop.
This article contains affiliate links. If you purchase through these links, we may earn a commission at no extra cost to you. We only recommend products we genuinely believe in.
Recommended Tools for Watercolor Sunsets
- Daniel Smith Essential Watercolor Set — Professional-grade pigments with exceptional granulation, perfect for sunset washes.
- Round Watercolor Brush Set (Sizes 4–12) — A versatile range of Kolinsky or squirrel-hair brushes for everything from fine detail to broad washes.
Explore more from the Calitoy Media Network
- Brushed Past — Art & Creativity
- Girl Next Up — Incredible Humans
- Risen Today — Spirituality & Mindfulness
- Spoof Daily — Humor & Satire
- Opened Terminal — Tech & AI